Thursday, June 30, 2016

Configuring ColdFusion 2016 Server Instances to Different Virtual Hosts (Multi-Homing)

The new ColdFusion 2016 version is different from its predecessors. The configuration files are laid out slightly differently. I wanted to install the newest version of ColdFusion but I could not configure the instances and virtual hosts of my existing projects like usual. After some digging around, I found the way. This post is to show how to setup multiple ColdFusion server instances and map them to their own virtual hosts, also known as multi-homing.

Long Story Short

I have found it is the same procedure as in Coldfusions 10 and 11, with the difference that there is no need to edit the server.xml file in every new instance's /runtime/conf directory and you must uncomment the last line in the instance's uriworkermap.properties file. Still, I will write the entire procedure for you if you're new to this or you're just a little rusty.

Requirements

  • ColdFusion 2016 installed
  • Apache web server installed

Note: I am working on an OS X machine but the procedure shouldn't be too different from a Windows or Linux machine.

Step 1

Creating the new instance

Go to the ColdFusion Administrator and create a new instance at the Instance Manager section of the Administrator. For this example, I will name the new instance test.

click to zoom

Once the instance has been created, take notice of the Remote Port number assigned to the newly created instance and try to remember it, we will use it in the next step. Do not start the new instance yet.

click to zoom

Step 2

Updating the workers.properties file

Inside your ColdFusion2016 folder, wherever it is you have ColdFusion installed, open the config/wsconfig/1/workers.properties file. The file contents should look like this:

worker.list=cfusion

worker.cfusion.type=ajp13
worker.cfusion.host=localhost
worker.cfusion.port=8016
worker.cfusion.connection_pool_timeout=60

You will add the name of your instance to the list in the first line (separated by a comma), duplicate the last block of 4 lines, then in the duplicated lines you will change the name cfusion for the name of the new instance you created and the port number to the same number of the Remote Port from the previous step and save the changes. In the end, it should look like this:

worker.list=cfusion,test

worker.cfusion.type=ajp13
worker.cfusion.host=localhost
worker.cfusion.port=8016
worker.cfusion.connection_pool_timeout=60

worker.test.type=ajp13
worker.test.host=localhost
worker.test.port=8012
worker.test.connection_pool_timeout=60

Step 3

Creating a .properties file for the new instance

In the same directory as the workers.properties file we edited in the previous step you should find a file called uriworkermap.properties. Duplicate that file and rename the new file, adding the name of the new instance to identify it. For example, I named the file uriworkermap_test.properties. Then you will open this new file and the contents should look like this:

/cfformgateway/* = cfusion
/CFFormGateway/* = cfusion
/flex2gateway/* = cfusion
/flex2gateway = cfusion
/cffileservlet/* = cfusion
/CFFileServlet/* = cfusion
/cfform-internal/* = cfusion
/flashservices/gateway/* = cfusion
/flex-internal/* = cfusion
/rest/* = cfusion
/api/* = cfusion
/*.mxml = cfusion
/*.as = cfusion
/*.cfm = cfusion
/*.CFM = cfusion
/*.Cfm = cfusion
/*.cfm/* = cfusion
/*.CFM/* = cfusion
/*.Cfm/* = cfusion
/*.swc = cfusion
/*.cfml = cfusion
/*.CFML = cfusion
/*.Cfml = cfusion
/*.cfml/* = cfusion
/*.CFML/* = cfusion
/*.Cfml/* = cfusion
/*.cfc = cfusion
/*.CFC = cfusion
/*.Cfc = cfusion
/*.cfc/* = cfusion
/*.CFC/* = cfusion
/*.Cfc/* = cfusion
/*.cfr = cfusion
/*.CFR = cfusion
/*.Cfr = cfusion
/*.cfswf = cfusion
/*.CFSWF = cfusion
/*.Cfswf = cfusion
/*.sws = cfusion
/*.jsp = cfusion
/*.hbmxml = cfusion
!/CFIDE/* = cfusion

Like in the previous step, you will change the name cfusion for the name of the new instance and make sure to remove the exclamation mark (!) at the last line and save the changes.

/cfformgateway/* = test
/CFFormGateway/* = test
/flex2gateway/* = test
/flex2gateway = test
/cffileservlet/* = test
/CFFileServlet/* = test
/cfform-internal/* = test
/flashservices/gateway/* = test
/flex-internal/* = test
/rest/* = test
/api/* = test
/*.mxml = test
/*.as = test
/*.cfm = test
/*.CFM = test
/*.Cfm = test
/*.cfm/* = test
/*.CFM/* = test
/*.Cfm/* = test
/*.swc = test
/*.cfml = test
/*.CFML = test
/*.Cfml = test
/*.cfml/* = test
/*.CFML/* = test
/*.Cfml/* = test
/*.cfc = test
/*.CFC = test
/*.Cfc = test
/*.cfc/* = test
/*.CFC/* = test
/*.Cfc/* = test
/*.cfr = test
/*.CFR = test
/*.Cfr = test
/*.cfswf = test
/*.CFSWF = test
/*.Cfswf = test
/*.sws = test
/*.jsp = test
/*.hbmxml = test
/CFIDE/* = test

(Note:It is this last line that creates a virtual directory to this new instance's ColdFusion Administrator. If you do not uncomment this line by removing the exclamation mark, then whenever you try to access the ColdFusion Administrator for this instance, it will take you to the main instance's Administrator instead [cfusion])

Step 4

Creating the virtual host

Now you must create the virtual host that will exclusively use the newly created ColdFusion instance. Go to where the virtual hosts are defined in your Apache configuration (It may be in Apache's httpd.conf file or the httpd-vhosts.conf file, check your Apache web server's documentation.) and add a new virtual host. It would be the same as any other virtual host you may have defined before, with one key difference: the inclusion of the JkMountFile parameter, which points to the .properties file we created in the previous step. It should look something like this:

<VirtualHost *:80>
    DocumentRoot "/Users/rulloa/Sites/test"
    ServerName test.local
    JkMountFile "/Applications/ColdFusion2016/config/wsconfig/1/uriworkermap_test.properties"
    <Directory "/Users/rulloa/Sites/test">
      Options Indexes FollowSymLinks
      AllowOverride All
      Order allow,deny
      Allow from all
      Require all granted
    </Directory>
</VirtualHost>

Step 5

Adding the registry to the hosts file

Make sure to add the virtual host's ServerName from the previous step to your computer's hosts file (the location of this file may vary depending on your operating system, check your operating system's documentation.)

127.0.0.1       test.local

Step 6

Firing everything up

Start the new Coldfusion instance and restart Apache so the changes take place. You should be able to see http://test.local from your browser and able to access the instance's ColdFusion Administrator fount at http://test.local/CFIDE/administrator.

Thursday, October 1, 2015

Configuring Multiple Instances of ColdFusion 10+ with Apache Virtual Hosts

Note: This is a curated blog post from Rob Brooks-Bilson's old blog, which is no longer existent. Although this was written at the time of CF10's release, the same procedure applies for CF11.

You can create additional ColdFusion instances and tie them to multiple virtual hosts in Apache (the multiple virtual hosts part is often referred to as multihoming).

For the purposes of this blog post, I'm going to assume that you've already installed ColdFusion 10 in the Server Configuration (Not EAR/WAR deployment). I'm also going to assume you chose to install Apache as your web server during the install process. This gives you a single instance of ColdFusion 10 (cfusion) with Apache connected to ColdFusion as localhost.

The first thing we need to do is create our new ColdFusion instance (for this exercise, we'll call the new instance cfusion2). To do this, we need to fire up the ColdFusion Administrator. Once logged in, click on the Instance Manager link in the Enterprise Manager section. Here you'll see a list of currently configured instances. To create a new instance, click the Add New Instance button:
click to zoom

Enter cfusion2 in the Server Name box. Leave the Server Directory as is. If you're on Windows, make sure the Create Windows Service box is checked. When you're finished, click Submit.
click to zoom
It generally takes a couple of minutes for ColdFusion to create the instance. When it's finished, you'll see a screen with a link back to the Enterprise Manager. Go ahead and click the link once it appears:
click to zoom
Once you're back in the Instance Manager, you should see the new cfusion2 instance. Notice how the HTTP Port column shows 8500? This is because the new instance is setup to use Tomcat's built-in web server. Don't worry about that right now, we'll get to fixing that in just a minute. For now, just note the value in the Remote Port column for your cfusion2 instance as we'll be needing it shortly.
click to zoom
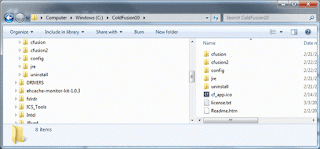
If you're wondering where ColdFusion 10 physically puts the directory structure for your instances, it's directly in the /ColdFusion10 install root:
click to zoom
Now it's time to make some changes to ColdFusion's underlying Tomcat server configuration and Apache Tomcat connector configuration. Fire up your favorite text editor and open the server.xml file located in:
C:\ColdFusion10\cfusion2\runtime\conf
About halfway down the file, you should see a line of XML that looks like this:
<Connector port="8013" protocol="AJP/1.3" redirectPort="8446" tomcatAuthentication="false">

Verify that the Connector Port matches the Remote Port you noted earlier from the Instance Manager for the cfusion instance.
At the bottom of the file, you should see some additional XML that looks like this:
<Connector port="8500" protocol="org.apache.coyote.http11.Http11NioProtocol" connectionTimeout="20000" redirectPort="8443" executor="tomcatThreadPool"></Connector>

This code is used to configure Tomcat's built-in web server. Since we want to connect our ColdFusion instance to Apache, we need to disable this. To do that, simply comment it out and save the file:
<!-- <Connector port="8500" protocol="org.apache.coyote.http11.Http11NioProtocol" connectionTimeout="20000" redirectPort="8443" executor="tomcatThreadPool"></Connector> -->

Now that we've disabled the built-in web server, we need to tell Tomcat we want to use Apache as our web server instead. To do this, we have to make some changes to the Apache Tomcat connector ColdFusion previously installed. The connector and its associated configuration files can be found here:
C:\ColdFusion10\config\wsconfig\1
The connector itself is compiled and named mod_jk.so. There's not much to do with it other than to verify that it's there. The two files that we're interested in for our instance configuration are workers.properties and uriworkermap.properties.
The workers.properties file is used to configure your server instances. If you open it up in a text editor, you'll see that it's configured for your default cfusion instance:
worker.list=cfusion

worker.cfusion.type=ajp13
worker.cfusion.host=localhost
worker.cfusion.port=8012

To add our additional cfusion2 instance, we simply have to make two changes:
worker.list=cfusion,cfusion2

worker.cfusion.type=ajp13
worker.cfusion.host=localhost
worker.cfusion.port=8012

worker.cfusion2.type=ajp13
worker.cfusion2.host=localhost
worker.cfusion2.port=8013

worker.list should contain a comma delimited list of all of the server instances you have. Below that, you need to configure the properties for each instance. You only need to concern yourself with the port here. Each ColdFusion instance gets its own port, which you can obtain from the Instance Manager in the ColdFusion Administrator.
Next, make a copy of your uriworkermap.properties file and name it uriworkermap_cfusion2.properties. The ColdFusion 10 docs tell you to rename it to uriworkermap1.properties, but I don't like that convention - especially if you have a lot of instances. Anyhow, change all of the mappings in the uriworkermap_cfusion2.properties file so that they apply to the cfusion2 instance. Here's how that should look:
/cfformgateway/* = cfusion2
/CFFormGateway/* = cfusion2
/flex2gateway/* = cfusion2
/flex2gateway = cfusion2
/cffileservlet/* = cfusion2
/CFFileServlet/* = cfusion2
/cfform-internal/* = cfusion2
/flashservices/gateway/* = cfusion2
/flex-internal/* = cfusion2
/rest/* = cfusion2
/*.cfml/* = cfusion2
/*.mxml = cfusion2
/*.as = cfusion2
/*.cfm = cfusion2
/*.cfm/* = cfusion2
/*.swc = cfusion2
/*.cfml = cfusion2
/*.cfc = cfusion2
/*.cfc/* = cfusion2
/*.cfr = cfusion2
/*.cfswf = cfusion2
/*.sws = cfusion2
/*.jsp = cfusion2
/*.hbmxml = cfusion2

That's it for the Apache Tomcat connector configuration. All that's left to do now is to setup our Apache virtual hosts, restart all of our servers and verify everything's working as expected.
Open your Apache http.conf file and notice that ColdFusion has placed the following directive at the bottom of the file:
# Load mod_jk module
Include "C:\Program Files (x86)\Apache Software Foundation\Apache2.2\conf\mod_jk.conf"

This directive tells Apache to load the mod_jk.conf configuration file that ColdFusion created when you told it to configure Apache as your web server.
Open your mod_jk.conf file and create the virtual hosts. Here's my mod_jk.conf file (I added some space and moved some things around to make it easier to read):
# Load mod_jk module
LoadModule jk_module "C:\ColdFusion10\config\wsconfig\1\mod_jk.so"
# Where to find workers.properties
JkWorkersFile "C:\ColdFusion10\config\wsconfig\1\workers.properties"
# Where to put jk logs
JkLogFile "C:\ColdFusion10\config\wsconfig\1\mod_jk.log"
# Where to put jk shared memory
JkShmFile "C:\ColdFusion10\config\wsconfig\1\jk_shm"
# Set the jk log level [debug/error/info]
JkLogLevel info
# Select the timestamp log format
JkLogStampFormat "[%a %b %d %H:%M:%S %Y] "

AddHandler jakarta-servlet .cfm .cfml .cfc .cfr .cfswf

<Files ~ ".hbmxml$">
Order allow,deny
Deny from all
</Files>

<VirtualHost *:80>
 ServerName localhost
 DocumentRoot C:/_web/cf10/cfusion/localhost/wwwroot
 ErrorLog c:/_web/logs/cfusion-localhost.log

 JkMountFile "C:\ColdFusion10\config\wsconfig\1\uriworkermap.properties"

<Directory "C:/_web/cf10/cfusion/localhost/wwwroot">
        Options Indexes FollowSymLinks
        AllowOverride None
        Order allow,deny
        Allow from all
</Directory>

    Alias /CFIDE "C:\ColdFusion10\cfusion\wwwroot\CFIDE"

    <Directory "C:\ColdFusion10\cfusion\wwwroot\CFIDE">
        Options Indexes FollowSymLinks
        AllowOverride None
        Order allow,deny
        Allow from all
    </Directory>
</VirtualHost>

<VirtualHost *:80>
 ServerName cfusion2.foo.com
 DocumentRoot C:/_web/cf10/cfusion2/zeus2/wwwroot
 ErrorLog c:/_web/logs/cfusion2-zeus2.log

 JkMountFile "C:\ColdFusion10\config\wsconfig\1\uriworkermap_cfusion2.properties"

<Directory "C:/_web/cf10/cfusion2/zeus2/wwwroot">
        Options Indexes FollowSymLinks
        AllowOverride None
        Order allow,deny
        Allow from all
</Directory>

    Alias /CFIDE "C:\ColdFusion10\cfusion2\wwwroot\CFIDE"

    <Directory "C:\ColdFusion10\cfusion2\wwwroot\CFIDE">
        Options Indexes FollowSymLinks
        AllowOverride None
        Order allow,deny
        Allow from all
    </Directory>
</VirtualHost>

For my cfusion2 instance, the single virtual host points to uriworkermap_cfusion2.properties:
JkMountFile "C:\ColdFusion10\config\wsconfig\1\uriworkermap_cfusion2.properties"

That's it for configuration. Go ahead and stop and start your ColdFusion instance and your Apache web server just to make sure all changes are reflected.
Test out the URL for your virtual host to make sure everything is pointing where it should be:
http://cfusion2.foo.com
Now open the ColdFusion Administrator on localhost:
http://cfusion2.foo.com/CFIDE/administrator
Everything should load up fine. In the Mappings section of the Administrator, /CFIDE and /gateway point to the correct locations:

For my cfusion2 instance, the single virtual host points to uriworkermap_cfusion2.properties:
C:/ColdFusion10/cfusion/wwwroot/CFIDE
C:/ColdFusion10/cfusion/gateway/cfc

Repeat the same process for your other virtual hosts, making sure the /CFIDE and /gateway mappings point to the correct locations for your instances.
That's it, you should now be configured for multiple instances of ColdFusion with multiple Apache virtual hosts.

Thursday, July 31, 2014

Setting up an iCloud Account on Windows 8's Mail

To set up your iCloud mail account in Windows 8's Mail:
  1. When using Mail, Go to Settings (by quickly moving your mouse to the top right corner of your screen and clicking on Settings when the icon shows up).
  2. Click on Account, and then on Add an Account. From there, choose Other Account.
  3. On the pop-up window, select IMAP, then click on Connect.
  4. You will then be asked to enter you e-mail address along with the password. This won't be enough so make sure to click on the Show More Details link text at the bottom.
  5. You will notice the form has expanded to ask for more information. Fill out the requested information like so:
    • Email Address: johndoe@icloud.com (also works with me.com and mac.com domains)
    • Username: johndoe (meaning, the part of your email address before the @)
    • Password: ****** (your email account's password)
    • Incoming (IMAP) email server: imap.mail.me.com
    • Port: 993
    • Incoming Server Requires SSL: checked
    • Outgoing (SMTP) email server: smtp.mail.me.com
    • Port:  587
    • Outgoing Server Requires SSL: checked
    • Outgoing Server Requires Authentication: checked
    • Use the same username and password to send and receive mail: UNchecked (once unchecked, you will see 2 more form fields pop up.)
    • Outgoing mail username: johndoe@icloud.com (your full email address.)
    • Password: ****** (your email account's password)
  6. Click Connect.
  7. Celebrate.
    Awww yeah!

Saturday, November 16, 2013

Setting Up Coldfusion With A G-Mail Account

One does not simply setup G-Mail in Coldfusion

I wanted to setup a mail account on a website i was developing so notifications could be sent out. I tried to configure my G-Mail account in my development environment. Even though my username and password were correct, Coldfusion wasn't able to actually send the e-mails. I had followed the instructions from Google but no dice. After looking through the error logs I found a recurring error message that read:

com.sun.mail.smtp.SMTPSendFailedException: 530 5.7.0 Must issue a STARTTLS command first

It seems that even though the server name, username and password were correct, I needed to enable TLS (and after a few tries I found out you also need to enable SSL) through port 465. That seemed to solve the issue.

In short, when setting up your G-Mail account on the CF Administrator, make sure you specify stmp.gmail.com as the mail server, your full email address as the user name, your password, port 465, and make sure you have both SSL and TLS enabled, like  so:

After this I was finally able to send the e-mails. Boromir would be proud.

Thursday, October 24, 2013

Running Coldfusion 10 on OS X Mavericks

I installed OS X Mavericks on my work computer. At first everything seemed great, not much of a departure from its predecessor, OS X Mountain Lion. For what I heard, most of the changes seem to be on what's working under the hood. Everything was going well until I wanted to get back to work on my development environment; turns out ColdFusion wasn't working any more...

yes, I'm a cat

After doing some research, I found out 2 major problems:

  1. Mavericks comes with Java 7.
  2. ColdFusion's web connector (mod_jk.so) does not work with Mavericks.
Fortunately, there is a solution for both.

The problem with CF is that it is currently pointing to the directory where the JDK 6 was located, so we must adjust the CF configuration so that it points to the new JDK 7. You can do so by following the instructions here:

http://www.n42designs.com/blog/index.cfm/2013/10/23/Running-ColdFusion-10-on-OS-X-Mavericks

Once you have mapped Java 7 in CF, we have to fix the web connector so that it works with Mavericks. Originally, this implied making a change in the web connector's source code, recompile it and replace the old one with the new one. Fortunately someone figured out that part already and even posted the new mod_jk.so file publicly, which you can download here:

https://skydrive.live.com/redir?resid=ACCA7C11400D15FA!618&authkey=!AOZJmH3HBrjvJ7s

After downloading the file, replace the old mod_jk.so with the new one you just downloaded in /Applications/ColdFusion10/config/wsconfig/1/.

Finally, start the ColdFusion server and congratulations! you now have ColdFusion 10 running on OS X Mavericks. Meow.

Credits go out to Sean Coyne at n42designs.com for coming up with the solution and a fellow developer named "Mike" that you can find at that site's comment section, who fixed the web connector and posted it online.

Wednesday, August 14, 2013

“Failed Signature verification” error while attempting to install updates on Coldfusion 10

When installing updates on your Coldfusion server via the Coldfusion Administrator application, you might see a pop-up window with an error message that reads:

Error occurred while installing the update:
Failed Signature Verification


This is because, as per the Adobe website:


All ColdFusion updates are now signed with the new code signing certificate because of a code signing certificate revocation.


To solve this issue, you must install the Coldfusion Mandatory Update, which you may find on the Adobe website at the following address:


http://www.adobe.com/support/coldfusion/downloads_updates.html

Look for the ColdFusion 10 Mandatory Update (JAR, 5MB) link further down the page and click to download.

Once you have downloaded the Java Archive (JAR) file,  install it by following the directions at the following web address:


http://help.adobe.com/en_US/ColdFusion/10.0/Admin/WSe61e35da8d318518-33adffe0134c60cd31c-7ffe.html

To make sure that the update was properly installed, access the Coldfusion Administrator and go to the Settings Summary page under the Settings section. On the System Information section, in the Server Details table, check that the Version is set to either ColdFusion 10,283111 or ColdFusion 10,282913. If so, the update was properly installed and you may now apply the pending updates on the Updates page.

Be reminded that each latest update released includes all fixes from its predecessors, meaning, if the latest update is Update 10 you may directly proceed to install it without needing to first install updates 1-9.